Plan wainscoting installation with clear guidance on styles, measurements, wall preparation, trim details, and what to discuss before requesting an estimate.
Wainscoting installation can add definition to a room, protect busy wall areas, and make a plain hallway or dining space feel more finished. The right result depends on more than choosing a panel style: wall condition, layout, trim, paint, and the room’s existing details all matter. This guide walks through the decisions to make before work starts and how to plan a project that suits your home.
What is wainscoting, and where does it work well?
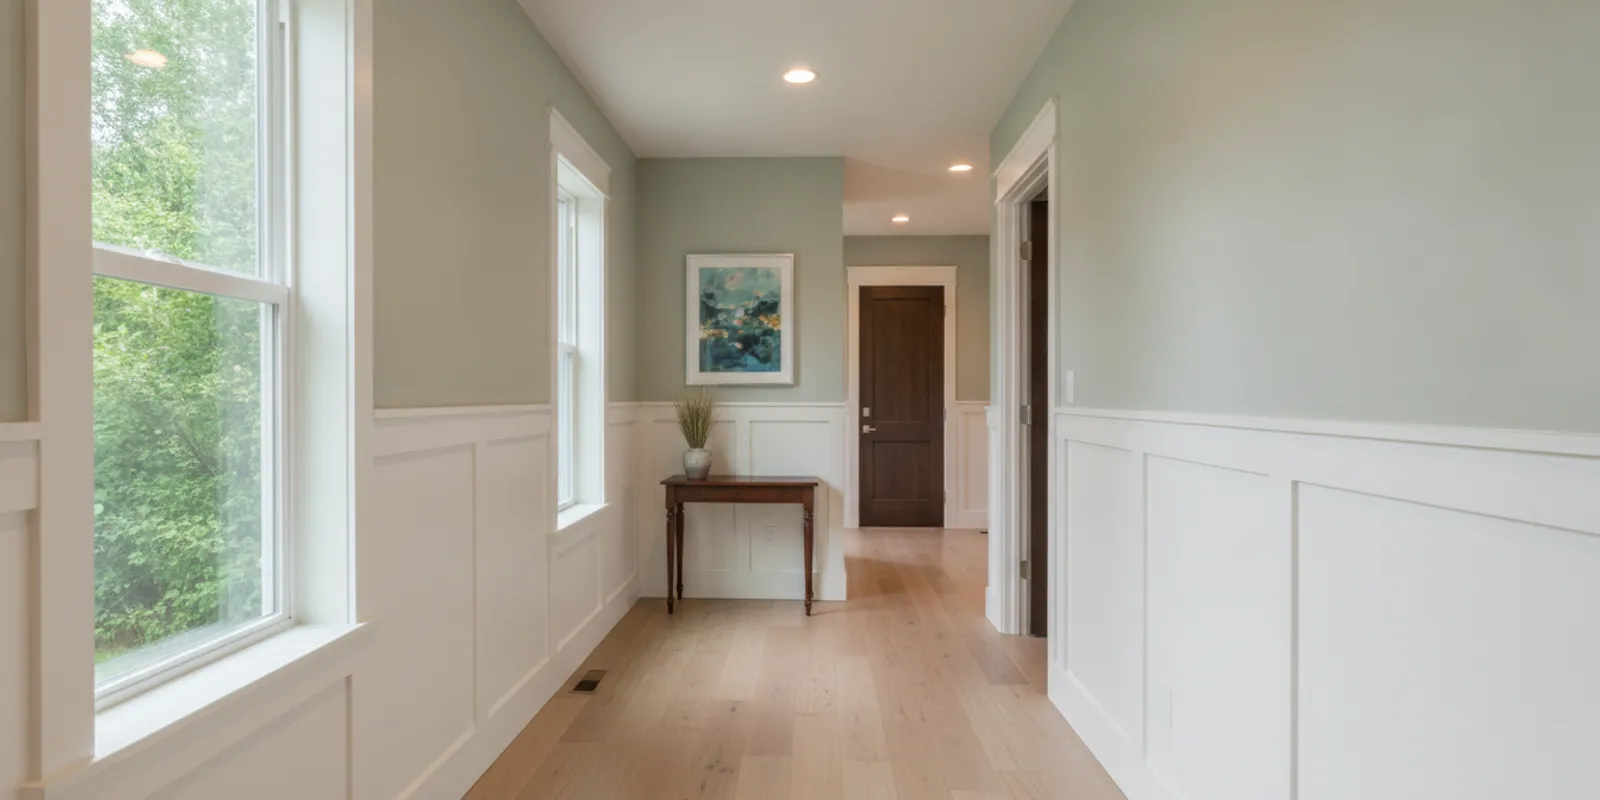
Wainscoting is decorative wall treatment installed on the lower portion of an interior wall. It commonly combines a lower rail or base, vertical trim or panels, and a top rail or cap. Some designs use flat panels framed by trim. Others use evenly spaced vertical boards or beadboard-style surfaces. The look can be formal, simple, traditional, or contemporary depending on the profile, spacing, and finish.
Because the treatment occupies only part of the wall, it can add visual structure without covering the whole room. It is often considered for entryways, hallways, dining rooms, stair landings, bedrooms, and other spaces where a durable, finished lower wall is useful. It can also help a large blank wall feel more intentional. The best candidate is a room where the treatment complements the existing doors, baseboards, flooring, and other trim rather than competing with them.
Wainscoting is a finish detail, not a substitute for fixing a wall problem. Loose plaster, moisture, damaged drywall, or recurring stains should be assessed before new material covers the area. A careful plan leaves access to features that need access and accounts for outlets, switches, heating elements, and door openings.
Which wainscoting style should you choose?
Start by comparing a few common treatments against the room you already have. These descriptions are a planning aid, not a product specification, so review samples before you settle on a look.
- Flat panels
- What it looks like: Simple framed sections with a quiet profile.
- When it tends to fit: Clean-lined rooms that need structure without heavy ornament.
- Beadboard
- What it looks like: Repeated narrow vertical lines.
- When it tends to fit: Casual or cottage rooms where texture is welcome.
- Board-and-batten
- What it looks like: Wider flat areas divided by narrow vertical trim.
- When it tends to fit: Hallways and larger walls that need a stronger rhythm.
- Raised traditional profiles
- What it looks like: Deeper panels and a more decorative cap.
- When it tends to fit: Rooms that already have substantial trim and a formal character.
Start with the character of the room and the amount of detail already present. A simple panel treatment can work with clean-lined interiors, while raised profiles and decorative caps tend to feel more traditional. Beadboard brings repeated vertical lines and can suit a cottage or casual look. Board-and-batten uses wider flat areas divided by narrow vertical trim. These are broad design descriptions; products and construction methods vary, so review actual samples before settling on a look.
Think about how the profile will relate to nearby trim. If the room has narrow, plain door casing, a very ornate cap may look out of place. If the home already has substantial trim, a very thin treatment might feel undersized. Matching every molding exactly is not always necessary, but the pieces should look like they belong together. Consider the visual weight of the baseboard, door casing, window trim, and any crown molding in the same sightline.
Color changes the effect, too. A treatment painted to match the wall can create quiet texture, while a contrasting color makes the lower wall a focal point. A painted finish can also make the panel details easier to notice. Look at samples in the room at different times of day, beside the flooring and existing trim. A small sample is more useful than judging color from a screen.
How high should wainscoting be?
There is no single height that works in every room. The ceiling height, wall length, window and door positions, furniture, and chosen panel pattern all affect the proportion. A height that looks balanced in one room may cut across another room’s windows or leave awkward narrow panels near a doorway. Instead of selecting a number first, test a few possibilities in the actual space.
One practical way to compare heights is to mark temporary lines on the wall with removable painter’s tape. View them from the main entrances and from where people usually sit or stand. Check whether a line runs into a window sill, a thermostat, or a wall feature. Also consider how the top rail will meet door casing and whether it can continue around corners without an abrupt stop.
Proportion matters more than following a formula. A shorter treatment may keep a small room feeling open, while a taller one can give a larger wall a stronger visual base. The panel layout must still work at the chosen height: overly narrow end panels can make an otherwise appealing design look crowded. Marking the full wall layout before installation helps reveal these issues while changes are still easy.
What measurements and layout details should you plan?
Measure each wall separately rather than assuming the room is perfectly square. Note the width of every wall, the position and width of doors and windows, and the location of outlets, switches, vents, and other fixed items. Record where inside and outside corners occur. A sketch with dimensions and labels can help explain the room to an estimator and make the design decisions easier to review.
Next, decide how many panels or vertical divisions you want and how consistently they should repeat. Equal spacing may be a useful starting point, but openings and corners can change the layout. A good plan considers the whole wall, including the pieces at both ends, rather than placing full-size panels in the middle and leaving narrow leftovers at the edges. On a long wall, check the pattern from a distance. In a small entry, inspect how the pattern meets the door trim and nearby wall.
Pay attention to transitions. Decide whether the treatment will continue around the entire room, stop at a doorway, or end at a natural boundary. Plan how it will meet an existing baseboard and whether the current base can remain. The top rail may need to return neatly at an end, align with casing, or terminate against another trim piece. These decisions affect the finished appearance and can influence the amount of cutting and fitting needed.
Make a separate note of items mounted on the wall. Outlets and switches may need to remain accessible, and their positions can affect where panel trim falls. Heating equipment, vents, thermostats, and built-in features also deserve consideration. Do not plan to cover an opening or device just to preserve an even pattern. Include these details in the sketch so the installer can account for them while arranging panel widths and discussing the scope.
Material selection is another early decision. Some projects use paint-grade trim intended for a smooth painted finish; others use a material or profile chosen for a particular look. Ask how the proposed material handles the room’s normal use and what preparation its finish requires. The product, wall condition, and design all affect how the edges and joints will look, so compare a sample or a clear product description rather than relying only on a style name.
Finally, distinguish the finished design from the installation sequence. A sketch should show the intended top height, panel rhythm, corner treatment, and openings, but it need not prescribe every cut. Let a qualified installer confirm the measurements in the room. That review can catch a wall that is out of square or a casing detail that makes a perfectly repeated layout impractical. The goal is a consistent overall appearance, not identical panel widths at the expense of awkward edge pieces.
If you are preparing for an estimate, gather a few clear photos from different angles and include close views of corners, openings, and any wall damage. A rough sketch is helpful, but an on-site review may still be needed to confirm details. Do not assume that a wall’s visible length alone tells the full story of the installation.
How should the wall be prepared?
Before wainscoting goes up, the wall should be checked for loose material, uneven areas, and signs that need attention. Small bumps or dips may affect how flat trim sits, while a loose section can undermine the finish. Identify peeling paint, soft spots, water marks, or gaps around existing trim. Resolve the cause of moisture or damage rather than hiding it behind a new surface.
Furniture and wall hangings may need to be moved or protected. The work area should provide enough room to measure, cut, fit, and handle trim safely. Discuss how the room will be used during the project, what needs to be cleared, and whether adjacent floors or furnishings require protection. If the room is part of a main route through the home, plan for access while work is underway.
Consider the existing paint and the home’s age when planning preparation. If renovation raises questions about older paint, dust, or safe work practices, consult the U.S. Environmental Protection Agency for guidance and discuss the concern with the contractor before work begins. Do not sand or disturb a questionable surface based on guesswork. The right preparation depends on the actual surface and project conditions.
Also decide whether wall repairs and painting are included in the project scope. Installing trim, filling small fastener holes, caulking suitable joints, priming, and applying finish paint are separate tasks that should be discussed in advance. Clarify which surfaces will be painted, how color will be selected, and whether the room should be empty before the crew arrives.
What details make the finished installation look complete?
Consistent spacing and clean transitions are easy to notice once the room is finished. The rails should read as level across the wall, and repeated panel or batten spacing should look deliberate. Corners, ends, and door openings need a planned finish rather than improvised pieces added at the last moment. These details are especially visible in a hallway or entry where a person sees several walls at once.
Connections to other trim deserve attention. The top rail should meet casing in a way that looks intentional. The base should sit neatly against the floor and relate to the existing baseboard. Where the treatment stops, an end return or another planned termination can create a cleaner edge. If a room has unusually shaped walls, stairs, or many openings, those conditions should be noted early because they affect layout and fitting.
Paint and caulk also affect the final impression. A consistent paint sheen and color can help the trim read as one coordinated feature. Joints may need appropriate filling or caulking, but not every joint should be treated the same way; material and location matter. Discuss the intended final finish and who is responsible for each preparation and painting step. This avoids a finished carpentry project being mistaken for a fully painted room, or the reverse.
Lighting can reveal surface variation, especially when it falls across a wall at an angle. Review the wall under the room’s normal lighting before approving the final appearance. A realistic review looks at the whole room as well as close-up details: how the style works with the floor, furniture, doorway, and adjacent walls.
Should you install wainscoting yourself or hire help?
A simple, straight wall with an uncomplicated layout may look manageable to an experienced DIYer. The work still calls for accurate measuring, careful cutting, appropriate tools, secure fastening, and patience with corners and transitions. Mistakes in the first layout can repeat across the wall, and uneven floors or walls can make fitting more difficult than it appears in a quick tutorial.
Hiring a professional may be worth discussing when the room has many openings, stairs, irregular corners, damaged surfaces, or trim that needs to match an existing finish. It can also help when you want one team to assess related repair or remodeling needs instead of coordinating separate trades. AllFix is a locally owned, licensed, bonded, and insured contractor serving Grant County, Adams County, and Spokane County, Washington, with handyman repairs, remodeling, residential electrical work, and commercial property improvements among its service areas. Availability and service scope can vary by location, so ask whether the specific work fits your property and area.
For an overview of the company's home repair scope, see AllFix handyman services. For broader interior project planning, review remodeling services. A page describing a general service category does not by itself confirm a particular trim job; use the estimate conversation to describe the room and confirm fit.
What should you ask before work begins?
A clear conversation before the project starts helps align the plan with the result you expect. Ask the contractor to review the proposed style, height, panel spacing, and where the treatment will begin and end. Confirm whether the scope includes material selection, surface preparation, installation, filling, caulking, priming, and painting. If any of those tasks are not included, ask what condition the room will be left in.
- Which wall repairs or preparation steps are included, and which are outside the proposed scope?
- How will the design account for doors, windows, corners, outlets, switches, and existing baseboards?
- What material and trim profiles are proposed, and what finish will be applied?
- How will the project area be protected, and what should be moved before the scheduled work?
- What is the expected sequence of work, and when will the room be ready for normal use?
- How will changes be discussed if a hidden condition or design issue appears?
Ask for the plan and estimate in writing so you can compare the included work with your priorities. The estimate should make clear what is being installed and what preparation or finish work is covered. If you want a different height, profile, or paint plan, raise it before accepting the scope rather than assuming it is included.
What can local property owners expect when requesting an estimate?
For a useful first conversation, describe the room, the approximate wall lengths, the look you have in mind, and whether you also need wall repair or painting. Mention any unusual corners, stairs, or nearby trim. Photos can provide context, while an on-site review may be needed to evaluate the actual conditions and confirm the scope. A free estimate is the way to discuss the project and its pricing; do not rely on a generic online figure for a room that has not been assessed.
AllFix serves Grant County, Adams County, and Spokane County, Washington, with Moses Lake as its primary service hub. Service availability can differ between communities and by type of work. Check the AllFix service area information and ask whether the specific project is offered at your address. For general questions or to request an estimate, use the contact page or call (509) 761-4778.
If you would like to see examples of completed work, browse the project gallery. Photos can help you explain a finish or general style you like, though they should not be treated as a promise that every detail or service shown is available for a new project. You can also learn more about the company through its reviews page.
Frequently Asked Questions
Does wainscoting have to cover every wall?
No. It can be limited to a single feature wall, an entry, or a portion of a room, or it can continue around a larger area. Decide where it should begin and end based on the room’s openings and sightlines so the stopping points look planned.
Can wainscoting be added to an uneven wall?
Possibly, but the wall condition should be assessed first. Unevenness may affect how trim sits and how much fitting or repair is needed. Identify the condition during the estimate discussion rather than covering it without review.
Should the panels be painted before or after installation?
The best sequence depends on the material, design, and scope. Some preparation may happen before fitting, with filling and final touch-ups after installation. Confirm which steps and coats are included and what final finish to expect.
Does AllFix provide wainscoting installation in every service area?
Do not assume every service is available in every community. AllFix serves Grant County, Adams County, and Spokane County, Washington, but the available work varies by location. Share your address and project details to confirm whether the job fits the service area and current scope.
What is the next step?
Good wainscoting starts with a layout that suits the room, careful attention to wall and trim conditions, and a clearly defined finish. Gather a few photos, note the details you want to preserve, and discuss the scope before choosing materials or scheduling the work.
With a considered plan and clear expectations, you can decide whether wainscoting is the right update for your home and take the next step with confidence.
Tell Us About Your Project
Fill out the form below and we'll contact you within 1 business day.